Tuesday, October 29, 2013

Pumpkin Carving

Last night the family spent some time together carving our pumpkins so I thought I'd share some highlights. Believe it or not, this was actually our first time carving pumpkins since Eric was born (he's 3 now)! I know, I can't believe it either. We do buy pumpkins every year and take him trick-or-treating, but we have never carved them before. But, we had a lot of fun and will now keep up with this tradition.

Eric had a blast drawing a face on one of the smaller pumpkins, as well as colouring all over one with a permanent marker. He kept telling me he had to colour it "really really fast". He was just too cute.

Here's our night in pictures.


Getting ready for the fun!
After Mommy cut open the top, I'm ready to clear out the seeds.

But only with a spoon (he hates getting his hands dirty).

Drawing my pumpkin masterpiece.

Admiring his work.

Our grand pumpkin display.

Are you ready for Halloween?

Friday, October 25, 2013

High Five for Friday!

What a week! I'm not sure about everyone else, but this week has just flown by! I'm very excited for the weekend so let's recap my five favourite things that happened this week shall we?
  1. I made homemade Vanilla Extract last weekend. You can view the post here. It's coming along really nicely and the colour is really starting to turn. After a week, this is what it looks like.


    2. I got my hair cut! When my hair starts bugging me; that tells me it's time for a cut. Unfortunately I don't have any pictures yet, but it's basically a shoulder length bob. I absolutely love it.

    3. I spent some much need quality time with my sister. It has been a while since we have just simply hung out or went shopping and it's so nice when we're able to get together. It's hard in our daily lives to keep up with the one's we love, so I am so happy we got the chance. I have a three year old, and she has a three year old and a 4 month old so she's got her hands full! 

    (Yes, we were pregnant at the same time during our first pregnancies - it was awesome!).

    4. I spent some time organizing some of my laundry room cabinets. I always feel a sense of accomplishment when I finish something like that, and it did turn our great if I do say so myself. I'll be blogging about organizing different spaces soon, but here's a sneak peek at  what I accomplished in my laundry room. 


    5. Tonight we are going out with friends to try a new local restaurant; it's called Shenanigan's. This is the time of month I look forward to quite often as we have a monthly outing where we go to a different local restaurant (no chains) to see what it's like, get a feel for it, try something different, etc. It's been a fun experience and we've certainly found some amazing places. We call ourselves, 'Fooding Hamilton'.

    Besides, who isn't up for a little shenanigan's every now and then?


Tuesday, October 22, 2013

DIY Fabric Covered Cork Board

My husband and I completely finished our basement at the beginning of the year and it is fabulous! One thing we were really excited about is finally having an awesome space where we can both be creative, work, have fun and play the occasional computer game. 

We currently share an office and if you can believe it, we haven't hurt each other yet! Actually sharing your office space with your husband isn't as bad as I thought it would be and it has really allowed us to spend more time together. My side is prettier though :)

Which brings me to my DIY fabric coloured cork board. I really wanted a place to hang up some of my sons art, some important items and a few other things. I also wanted something that looked appealing and that I could dress up a bit if I wanted to - and I did. 

This is what I came up with.


It's actually pretty easy to do and you don't really need a lot of supplies.

For this project, you will need:
  • Cork Board. Mine is fairly big at 23"H x 35"W.
  • Fabric, about 3 inches larger than the size of your cork board.
  • Stapler
  • Embellishments
  • Hot Glue Gun (optional)
You can finish this project with just a few easy steps.
  1. Lay out your fabric right side down and position your cork board on top so that the extra fabric is equal all around, with the cork side down.
  2. Fold the fabric over to the back on the cork board and staple down as you fold the fabric over. Use as many staples as you need to use to get the fabric to stay in place. If you need a little extra staying power, use the hot glue gun with the staples; just be sure everything is done on the back of the cork board so the front stays nice and clean.
  3. Once your finish stapling, gently turn the board over and add your embellishments.
  4. Hang your cork board and enjoy! 

These embellishments are from Michaels.

Thanks to my husband for hanging it up for me.

Doesn't that artwork look great?

Enjoy!

Sunday, October 20, 2013

Homemade Vanilla Extract

With Christmas just over 5 weeks away, I am seriously starting to think of gift idea's for the many people in my life (you really wanted that reminder, didn't you?). Along with the gift-giving that comes along with Christmas, there is also the many dinners and parties you'll attend. In either case, wouldn't homemade vanilla extract be a wonderful gift idea for your family, friends and colleagues? Homemade gifts are really awesome and many people really love things that comes from the heart. It's within the meaning of Christmas after all.

Thanks to Bethany Actually (whom I found on Pinterest) and a couple of other online sources, I found out that making your own vanilla extract is actually super easy! 

Here's what you'll need: 
  • Vanilla Beans
  • Vodka, any brand and can be inexpensive. I used Absolut Vodka.
  • Glass bottles with lids
  • Measuring cup
  • Funnel
  • Knife
  • Cutting board
  • Paper Towels
  • Ribbon or twine (optional)
For the vanilla beans themselves, I bought mine through eBay from Vanilla Products USA and used Grade B Bourbon Planifolia Vanilla Beans grown in Madagascar. The service and delivery time were pretty good and I would purchase from them again. It costs about $24 (including shipping) for 30 beans.

For the glass bottles I used, I used 4 oz. Boston Round bottles purchased from Uline, which is located in Brampton, ON. You will need to purchase a case of 24 as a minimum. They were about $30 for the case.
First and foremost, be sure to wash your bottles and lids with hot soapy water and then let them air dry.

Using your sharp knife, cut your bean in half. Then, about a half inch down from the end slice the bean in half lengthwise.

Once you have all your beans cut and ready to go (I used all 30 of mine for 12 bottles), put 5 pieces (two and half full beans) of bean into your glass yours. If you have any extra pieces (I had one), just add it to a jar.

Once your jars are full of beans, you ready to pour the vodka. Add half cup of vodka to each bottle ensuring that the beans are fully covered.
Your funnel likely wont stay still on it's own so be sure to hold the funnel while your pouring in the vodka.
After adding the vodka, simply screw on the caps tightly and you're done! You can see the vodka starting to change colour almost instantly.

Important care instructions: Be sure to store these in a cool dry place. From what I read online, the vanilla will be good to use in about two months time. Just be sure the give the bottles a gentle shake a few times a week.

After the vanilla is ready you can remove the beans or leave them in, just note that the vodka will evaporate over a long period of time. In this case, simply top up the vodka to ensure the beans stay covered.


Since these are Christmas gifts, I went a step further and created these labels using MS Publisher. I followed the same label idea as Bethany Actually. Ingredients listed is love, vodka and vanilla beans. A sweet touch for your friends and family.

In my case I only labelled 6 as I will likely keep a couple bottles for myself with all the baking I do, but also because I'll be including a bottle in my Secret Santa gift at work and will create a more generic label for that (will post about this gift idea sometime in November).

Since the vanilla takes about two month's to be ready, you can also add a 'Best After Date' to your label or simply add that piece of info in your card (assuming you give them one).


I'm pretty happy with the way they turned out. The picture below shows how the colour changed in only a 24 hour period. They'll eventually be very deep amber in colour.
You can also dress up the bottles with ribbon or twine for a nice added touch.
I hope you enjoy making your vanilla as much as I did! Feel free to comment below with any questions, etc.

Good Luck!

Saturday, October 19, 2013

October Ipsy Glam Bag

For those that follow my blog you will know that I have a love for GlossyBox; or that I had a love for GlossyBox. Sadly, GlossyBox Canada went bankrupt several months ago :( It was a sad day my friends. It was truly my favourite time of the month - imagine getting a surprise in the mail every month!

However, I learned from some wonderful ladies that other options we available, so now I bring you the Ipsy Glam Bag. Ipsy Glam Bag is a set of five personalised beauty products that get sent to you each month. They are personalised based on the profile you create when you join. The cost is only $10 a month, plus a few extra dollars for shipping. So cheap right?

Now I really do like Ipsy but my preference would be Glossybox if it were still offered in Canada. I say this because I liked the products I got from Glossybox better. I find most of the products sent by Ipsy I wouldn't buy per se, unless they were on sale. I do love the experience of trying different products though so Ipsy makes me happy.

If you like trying out different products - the Ipsy Glam Bag is for you!

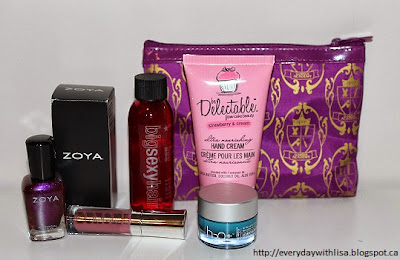
Here's what I received in October:

1.  Zoya Nail Polish in Mason. I have a love for Zoya nail polish in general. I think it has fantastic quality and long lasting wear. Though this colour is pretty, it is really too dark for my fair skin and is not a colour I would normally purchase. I think I will pass it onto my mom; she has a thing for darker colours.

2.  Buxom Lips in Dolly. This gloss comes from Bare Essentials and I have been wearing this gloss for the last several days and I am really enjoying it. The colour is perfect, the gloss itself is very light-weight and smooth. I would definitely buy this product.

3. Big Sexy Hair Blow Dry Volumizing Gel. I haven't used this product yet but I plan to this weekend to just give it a try. The only products I use in my hair tend to be Aquage Uplifting Foam and a little hairspray, so this will be very different for me. I'm typically not a big fan of hair gel but I will give this a shot and will post a review soon thereafter.

4. Strawberry & Cream be Delectable Hand Cream by Cake Beauty. I'm a big hand cream user so I used this product several times. Though I'm usually a big fan of Cake Beauty and this cream does smell nice, the scent is VERY strong and overwhelming. So overwhelming in fact, that I probably wont use the hand cream again. If you're a fan of heavily scented items this is for you, but if not you might want to steer clear of this one.

5. H2O+ Face Oasis Hydrating Treatment. According to H2O+, this product is an oil-free gel moisturizer that delivers deep hydration while diminishing the appearance of fine lines. I have used this product a few times and like it. Again, I'm not that fond of gels (gel anything really), but this really provides smooth feeling skin. I typically use Aveeno skin moisturizer and will continue to use it. I don't think I would purchase this gel on my own as it costs $43 for 50 mL.

You'll also notice a make-up bag in the picture. This IS your Glam Bag and you'll get one each month. They come in handy when travelling and for storing smaller items in the bathroom.

What did you get this month?


Monday, October 14, 2013

Giving Thanks

This past weekend we celebrated Thanksgiving (for us Canadian folk), and it was absolutely wonderful. We had a lot of family fun that included the pumpkin patch, a fire station tour, Springridge Farms, and a lot of family time. This time of year always makes me happy. It's filled with pretty fall colours and great weather, and is perfect for those nice Fall boots and scarves, among other things!

Though Fall boots and scarves are nice, Thanksgiving always reminds me how lucky we really are. I often think about how people around the world (or even people in our own city) are less fortunate then we are; with little to no food, no shelter, and in some cases no family. We take everything around us for granted, without even thinking about it. We turn on the faucet for a drink of water, we eat the food on our table, we have shelter, clothes, public education, etc.

There are many variables that affect the situation people are in, but I truly feel blessed for what I have and for what I am able to give. For example, just a few months ago my husband Doug and I spent around $100 on baby food items and donated it all the our local Food Share, and we make it appoint to donate to the Salvation Army every Christmas. We even had our three year old go through his toys so he could donate them, "to other little boys and girls who don't have any toys" as he put it. I also just donated blood for the first time last month.

If you have the capability to give in any way, whether it be a food, toy, or other donation, I encourage you do to so - every little bit helps.

I feel so blessed that I have the friends and family that I do. I really give a lot of credit to my parents for raising three kids with the values of helping other's and giving back to the community, while also providing us with the best childhood as possible while oftentimes struggling financially. Hard work, kindness, and  respect were driven into us and I only hope that I have taught Eric some of these values already and that I can continue to do so in the future.

I am thankful for my husband and son. My husband and I have had some rough times together but he's always there for me no matter what. His love and support has really helped me at times when I've needed it most and I am so thankful for that. My son is my rock. I love him more than he will ever know. He's my sunshine, my little man, my everything. I am so lucky to be his mom.

I am grateful for friends who have been there for me for many, many years. While either helping me with my personal demons or for simply lending an ear when I needed to vent. You guys are my rock and I probably can't ask for anyone better.

So this Thanksgiving, I am thankful for family, friends, freedom, choice and all that I have.

- Lisa

Monday, October 7, 2013

Homemade London Fog

Okay, so back in the summer I was introduced to a drink called London Fog; you may have heard of it. It's an earl grey tea latte with steamed milk and vanilla syrup. I was a bit hesitant  to give it a try at first because I am not a big risk taker when it comes to drinks, and I'll be honest, I love my Tetley Tea! However, while away one weekend with my girlfriends I finally decided to give it a try and I've been hooked ever since. Not good since a Grande at Starbucks will cost you $4.80.

So after enough nagging from my husband to stop spending so much money on drinks, I scoured the internet for homemade recipes (and when I say scour, I mean I went to Pinterest and searched Google). After a little experimentation I have finally made the recipe my own. It's quick, easy and my husband likes it too!

Let's get started.

You'll need:
  • Earl Grey Tea Bag
  • 1 tbsp. of vanilla syrup
  • 1 cup of boiling water
  • 1/2 cup of heated milk
  • Cinnamon (optional)
Directions:
  1. Put the vanilla syrup in a mug and add the tea bag.
  2. Pour in boiling water and let the tea steep for 5 minutes.
  3. In the meantime, heat the milk in the microwave for 55 seconds and froth with a milk frother (works best) or a whisk.
  4. Using a spoon to 'hold' the froth, pour the milk in the tea and add the froth on top.
  5. Add a dash of cinnamon on top if desired.
That's it! There is really nothing to it. If you're going to make these often, I would invest in a hand held milk frother. I bought mine at Home Outfitters for only $9.99!


This latte also pairs nicely with homemade apple cinnamon muffins - but that' a post for another day.

Enjoy!

- Lisa

Thursday, October 3, 2013

DIY Fall Wreath


Fall is here; or is it? With this weather we've been having I think Mother Nature is a little confused. But who can really complain about 25 degree weather in October? Not this girl - I will take as much of this as I can get. Though, I have enjoyed wearing my nice scarves on the coolers days we've had in between.

However, it is Fall and this is often the time I start doing a lot of DIY and crafting projects, and this year I've really started things off nicely with my Fall Wreath.

Here's what you need:

  • Twig Wreath ($4.99 at Michael's)
  • Assorted artificial leaves ($1.50 for a 25 pack at Walmart)
  • Assorted Fall Berries/Accent Décor (between $1.99 - $3.99 at Michael's)
  • Letter ($6.99 at Michael's)
  • Hot Glue Gun
Directions: Arrange the leaves in the wreath as you see fit using the hot glue to keep them in place. Add the fall berries and accent pieces as appropriate and hot glue the letter in place (H for my last name).

This project was so easy and only took me 20 minutes. It also only cost me about $20 to make since I already had a few things on hand.