Since I've been home with Andrew, I've really been enjoying the time I get to spend at home. From just spending time with him, to baking, cooking, and sometimes catching up with my PVR, one thing I never get tired of is making jam (and that usually happens when jam goes on sale!). I'm so happy to share this recipe with you!
Seriously, this stuff is so amazing!
It makes 8 jars; but trust me - they won't last long!
Here's the tools that you'll need:
- 8 x 250 ml jam jars with lids - Tongs - Sm. pot - Lg. Pot - Measuring cup - Potato masher - Knife
- Oven Mitts
- Large Bowl
- Funnel (optional)
Ingredients:
4 1 lb containers of fresh strawberries
¼ cup of lemon juice
7 cups of sugar
1 package of liquid pectin
Directions:
1. Preheat oven to 225 degrees, and while waiting for the oven to heat, wash and core the strawberries.
2. Place the jars (without lids) in the oven for 10 minutes and then turn off, leaving the jars in the oven until needed. This will sterilize them and help keep them warm for the canning process.
3. Place the jar lids into a small pot of boiling water and boil for 2 minutes, then turn off the heat. Leave the lids in the pot until needed.
4. Put the strawberries in a large pot, several at a time, and use the potato masher to mash them all up. You want to ensure there are no large chunks and have the consistency and look of strawberry salsa.
5. Once you have crushed all the strawberries, measure out 3 ¾ cups. Be sure to be as accurate as possible here, or you may throw off the recipe! I used the bowl I put the cut strawberries in for the amount needed, and saved any extra of later use (they make a good ice cream topping!), and just poured the correct amount back into the pot. 6. Turn on high heat and add in the lemon juice and sugar, then stir, sir, stir! You'll want to bring the strawberries to a rolling boil. Once at a rolling boil, continue to boil for one more minute.
7. Remove the pot from the heat and add the liquid pectin, stirring continuously for five minutes. Once you're done stirring, skim off the foamy part of the jam.
8. Pour the jam directly in the warmed jars (be sure to use gloves, the jam is super hot!). You can pour directly in the jar or use a funnel like I do (it's so much easier with one). Be sure to leave ¼ inch room at the top of the jars to allow for sealing.
9. Place the lids on and screw tight!
10. Allow the jam to cool for 20 - 30 minutes on a cooling rack, then poke the top-middle part of the lid. You'll hear a 'pop', which is a sign that the sealing worked.
After a couple of hours, you'll start to notice the thickening of the jam which is when it's good to eat! The jam will store in the pantry for up to a year, but like I said before, they won't last that long.
These also make great gifts for friends and family, and you can even make pretty labels like I did.
I'd love to hear how your jam turned out. Let me know in the comments below. Enjoy!
Disclaimer: Original recipe can be found here. Reposted with permission.
This year I decided to do something a bit different for Eric's Easter gift. We generally don't go crazy with celebrating Easter around here so I often don't like to spend too much money on buying Easter gifts.
While we do a small Easter egg hunt at home, as well as one in the community, Eric also usually gets some chocolate from his Nana and Papa (their grandchildren are spoiled!), so I keep our gift for him pretty minimalistic.
Instead of just getting him a chocolate bunny and some Easter eggs, this year I decided to go with something smaller - but way cuter!
This super easy DIY mason jar gift idea is perfect for those struggling with finding a last minute Easter gift, or for those who just want to take their gift up a notch. It's inexpensive and takes no time at all to put together!
Supplies:
Mason Jars
Easter grass
2 - 3 small Chocolate Bunnies, per jar
10 - 12 mini Easter eggs, per jar
Small piece of fabric for lid, optional
Directions:
It's simple really!
1. Put the grass in the mason jar (you may need to press it down a bit in order to slightly flatten it out.
2. Arrange the chocolate bunnies on the grass.
3. Place the mini chocolate eggs around the chocolate bunnies.
4. Cut the piece of fabric to the size of the jar lid and place it over the top; screw on the lid.
I mostly used the fabric to cover up the label sticker that wouldn't come off, so if you don't have this issue, this step is optional (though it looks pretty).
I made this crayon wreath for my son's daycare teacher and gave it to her on his last day there. She loved it so I have also decided that I'm going to make one her his Kindergarten teachers as well.
It will be the most perfect Christmas gift for them; unique, unexpected, and I am sure all the kids will love it too!
Oh, and it's super easy so you can have the kiddies help too!
What you need:
Two Embroidery Hoops (one 12 inch and one 8 inch).
64 Crayons
Ribbon
Assorted school stickers
Block letters
Hot glue gun (forgot to include that in the photo!)
How to:
1. Place the small hoop inside the large hoop, ensuring there is equal distance all the way around. I put the embroidery hook the at top part of the wreath because it's easy to cover with the ribbon later.
2. Starting at the top, glue the crayons on one-by-one by using your hot glue gun; dabbing a a small dot on the top and bottom embroidery hoop, placing your crayon on top.
Leave a small gap at the bottom as it can get pretty tricky to get the nice even circle if you don't. Spacing as you go works well; and you don't need to be afraid of pull off the crayon if you make a mistake - I did that many times!
I've seen many tutorials that have you lay out the crayons on the embroidery hoops first, but don't waste your time with that. It takes too long and the crayons never stay in place anyway.
3. Once you glue all the crayons, tie the ribbon at the top around where the embroidery hooks are; the ribbon covers them really well. I just tied a bow at the top, but you can get more creative if you want. Just make sure that the bow or knot is tight at the top so when you hang up the wreath it doesn't fall down!
4. Arrange and glue your stickers and block letters as you wish. The stickers will not stay on on their own, you will need to use the glue for them.
That's it! Super easy right? And once I was in my groove, it took me about half hour total to do. I am sure your child's teachers will love it!
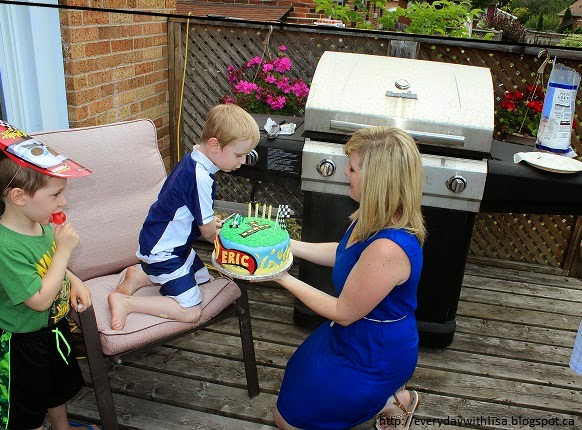
Eric turned four this past July and this year he had a Hot Wheels themed party. We had a racin' good time (see what I did there?).
It turned out really well; and though I used a lot of Pinspiration for this I made all the decorations on my own with the exception of the water bottle labels - I bought those from Etsy (whose shop no longer exists unfortunately). For the race cars I used for the food tent labels, I bought the clip art here.
I'm super happy how it turned out and the birthday boy definitely had an awesome day. His three hour nap afterwards proved it.
Picture this: You’re recently engaged. You’re happy, excited, and more in love than ever before – just as you should be! Congratulations to you both!
You’re now in the beginning stages of planning your wedding and can finally start thinking about all of those DIY Pinterest projects that you’ve been pinning for years. But before you get too involved in your do-it-yourself (DIY!) projects, you need to ask yourself, “Is this really worth it?”
Booking your venue, photographer, and cake designer are easier once you’ve determined the overall style and design of your wedding, but there is a lot to consider when planning to tackle invitations, décor, and all of the other nitty-gritty details, DIY-style!
Don’t get me wrong. I LOVE all things crafy and DIY, and had actually incorporated some cute little projects in to my own wedding, but here are a few things to consider before embarking on the DIY wedding path.
{Time Management}
DIY projects take time.
A lot of time.
Do you have the extra time to spare in between your work, fiancé, family, and friends to spearhead all your DIY projects (and get them done on time!)? What looks oh-so-simple on Pinterest can actually take dozens and dozens of hours to complete.
When considering your time invested in a project, don’t ignore quantities. A grand affair of 300 of your nearest and dearest will tax your time budget for DIY invites far more than an intimate gathering of 40. The same applies to favours, programs, centerpieces, etc.
Ensuring you have time to complete projects is critical as there is nothing worse than being half-way done your project, with life catching up with you, and then having to scramble last minute leading up to your wedding day. So much stress! And it’s all unnecessary.
Sure, you might be saying… “Oh, but my bridesmaids! And my friends, and family. They will all be there to help me. That will save a lot of time.”
But make sure you think about their own time with other wedding duties, their own families, out of town guests, significant others, and friends. And if they’re still willing to help, that’s awesome!
…. but are you sure that you actually want their help?
What if your mother-in-law ends up gluing all your single-faced satin ribbon on the wrong side? or what if your Maid Of Honour’s penmanship doesn’t stay consistent across ALL of your escort cards? Not only are you left having to carry out an awkward conversation, but on top of that, you’re going to have to re-do what they’ve already done (increasing time and money invested in to what was supposed to be a simple, DIY task).
{Money Talks}
And if we’re on the topic of money, I’ll be honest with you… some DIY projects can get surprisingly pricey.
Be careful with what you pick up at the dollar store. The glass is usually less dense, the candles are made of the lowest grade of wax available (just ask Mary about the one time a bride nearly burned down her venue), and adhesives don’t boast the same durability of higher quality options.
Hobby stores have beautiful, great quality items, but purchasing everything through them may end up costing you as much as it would to have everything professionally done, especially if you’re spending your own time putting it all together. Some craft stores have lovely pre-made stationary sets though, and you can design and print your own invitations, ceremony programs, reception menus, and Thank You cards at a fraction of the cost of ordering from a vendor.
To help brides stick to DIY project budgets, the WG website launched The Shops @ WG, where you can buy items like vases, candles, mirrors, vase filler, ribbon and decor items directly from our wholesalers; robust event quality, on a budget!
{Décor}
The reality of making things beautiful, and I mean really, really BEAUTIFUL, takes either time, or money, or both.
Décor will be among the most expensive and time consuming of all your DIY projects. There are so many elements of design when it comes to adorning your wedding with all-things-stylized-and-gorgeous.
Centerpieces, for example, depending on the theme of your event, are made up of a handful of elements that need to be seamlessly designed together to create a beautiful cohesive look.
Not only are there a number of small details that should be included to create depth, balance, and personality for your centerpiece, if you’re not able to make all the elements of it yourself (or can’t buy in bulk), retail costs will climb quickly.
Oh… and as far as bulk is concerned…. I won’t tell you how many times I’ve seen brides in discount department stores begging the manager to start making phone calls to find a large quantity of the onespecific item they’re looking for… to no avail.
But let’s say you do find the items, you do put together all your lovely centerpieces and they’re happily residing around the perimeter of your living room, dining room, and across the kitchen counter. Now, what about setup? Do you have access to your wedding venue the night before the wedding or have they given you a narrow time frame on the day of? Do you have people who can help you set up? Do you have a large enough vehicle (or access to more than one) to transfer all the fruits of your labour safely and efficiently?
Don’t forget that etiquette suggests the night before the wedding should be spent at your rehearsal dinner with friends and family (and out of town guests) and not painstakingly setting up your venue, last minute.
Weddings are stressful enough – the night before should be spent being pampered and in love, not worrying about whether your escort cards were set up straight.
If you’re DIYing an outdoor wedding, have you considered whether everything that you need to set up (the day before, or the day of) is in place?
Yup.
It’s stunning alright!
But if you’re using natural elements as part of your design scheme, make sure you don’t forget your ladder at home! Oh, and if there’s a chance for wind, make sure your lanterns are heavily weighted (but not too heavily, as you don’t want the branch snapping and crashing in to your cake).
Note: As a wedding planner, it is my responsibility to warn you that there is always a chance of wind.
--------------
Check out this video that Mary made for eTalk last year about DIY weddings.
Yes, Blake Lively and Ryan Reynolds had a crazy-gorgeous barn-set DIY-inspired wedding. But did you know that it took a team of SIXTY of Martha Stewart’s planners and coordinators to make it come to life??
As a crafty, seasoned DIY-er, I’m not here to dissuade you from your creative ideas and budget-savvy decor. If anything, I want to see you DIY-away!! But as a wedding planner, it is my job to make you consider the details…ALL of the details.
It’s my job to make sure that a bride, who is usually planning her wedding for the first time, knows the good, the bad, and the ugly of the feat she’s about to undertake.
The trick, ladies, is balance.
If you love the personal touches of DIY details, pick a few that are most important to you and leave the rest to an expert. Consider cost before hastily making purchases, and remember that your time is valuable too.
Most importantly, make sure to ask for help. If you’d DIY’d your entire wedding day vision, you best be bringing on board a Day Of Coordinator who will work alongside you pre-wedding to ensure that all the intricate little details are set up exactly how you imagined while you’re busy with hair, makeup, and bridal portraits.
A wedding is a production, but getting married is about being in love. Go ahead, be crafty… but don’t let your commitments to 184 DIY favour tags overshadow your excitement to walk down the aisle and say, “I do.”
--------------
If you have questions about DIY styling or want to get in touch about hiring a Day Of Coordinator to help make your wedding day flawless, email me: lisa@weddinggirl.ca
To buy decor items from The Shops @ WG, or to have our budget-savvy floral team help you boast beautiful blooms without breaking the bank, make sure to get in touch! I’d be happy to help you custom-pick your items and style your designs.
Before I get into talking about my quick dry nail tip, I thought I'd just give a quick update first since it's been a couple of weeks since I last posted. First, we had a leak in our basement ceiling caused by a leaky dishwasher and then last month our water tank broke and flooded our basement. Lucky eh? So we've been spending the last several weeks pulling up our basement floors, drying everything out and then putting new flooring back in (which is basically done now. *cue the excitement!*
I've also been busy with my WeddingGirl venture, which I'll be posting about soon. So, thank you for sticking with me while I was on a bit of a hiatus; I should be back to regular posting now.
For today's post, I just wanted to post a quick dry nail tip that I learned from Pinterest. I am the type of girl who always loves to have her nails done. It just makes me feel put together and I feel it really completes my look. I feel very feminine with them done.
I'm not that adventurous when it comes to colour though. I tend to stick with light pinks, neutral colours, etc., but sometimes I find that it takes so long to do my nails because for lighter colours I tend to need at least three coats. Drying takes forever when that happens. So, in comes my quick dry tip: PAM!
You've probably already seen this on Pinterest, and while I was sceptical at first, I decided to give it a try...and I haven't looked back since! While it can be a bit messy, it really does work!
All you need to do after every coat is:
1. Spray your nails with Pam from about 7 - 8 inches away and let the oil sit for 2 - 3 minutes.
2. Gently wipe your nails with a Kleenex to wipe away the excess oil.
3. Gently wash your hands with soap and water.
4. Reapply your polish, and repeat as necessary.
It should be noted that if you tend to put on a thicker coat of polish, you'll need to wait a few more minutes for your nails to dry. I also recommend that you still give your nails additional time to dry after you are completely done your nails as having several coats of polish on can still be a be soft as you finish.
Please leave me a comment below if this worked for you. I would love to hear about it!
I have been talking a lot about weddings recently and my goal to become a Wedding Planner, so why not share some of my own DIY wedding projects? Since my 5th wedding anniversary will be this year (August 29th to be exact), what a perfect time than now to start sharing.
I did quite a bit of DIY projects for my wedding; Save the Date cards, invitations, table names, seating plan...you get the picture. Well, since I'm quite crafty it seemed like a natural fit.
Our wedding was a traditional church wedding; we were married in a United Church since Doug and I are not really all that religious, so I did keep things pretty simple with my projects.
So let's get start shall we? All I needed for the cards were:
Blank card set from Michael's (came with envelopes).
A 'Save the Date' stamp with black ink.
Cake stickers
Scissors
Double-sided pop-up 'buttons'
Clear labels
Scrapbook Paper
White card stock paper
Glue
All I did was place a cake sticker on the front left side of the card and stamped 'Save the Date' on the other. I then printed our details on the white card stock and glued it onto blue scrapbook paper for a pop of colour (our wedding colours were blue and white). I then used the double-sided buttons to 'pop up' the insert, while placing the 'invitation to follow' note at the bottom inside with a clear label.
Isn't that super easy? This was actually a really cost effective way to make save the date cards. I had to make over 100 of them so it was time consuming, but I loved every minute of it and felt very accomplished afterwards.
My husband and I completely finished our basement at the beginning of the year and it is fabulous! One thing we were really excited about is finally having an awesome space where we can both be creative, work, have fun and play the occasional computer game. We currently share an office and if you can believe it, we haven't hurt each other yet! Actually sharing your office space with your husband isn't as bad as I thought it would be and it has really allowed us to spend more time together. My side is prettier though :) Which brings me to my DIY fabric coloured cork board. I really wanted a place to hang up some of my sons art, some important items and a few other things. I also wanted something that looked appealing and that I could dress up a bit if I wanted to - and I did. This is what I came up with.
It's actually pretty easy to do and you don't really need a lot of supplies.
For this project, you will need:
Cork Board. Mine is fairly big at 23"H x 35"W.
Fabric, about 3 inches larger than the size of your cork board.
Stapler
Embellishments
Hot Glue Gun (optional)
You can finish this project with just a few easy steps.
Lay out your fabric right side down and position your cork board on top so that the extra fabric is equal all around, with the cork side down.
Fold the fabric over to the back on the cork board and staple down as you fold the fabric over. Use as many staples as you need to use to get the fabric to stay in place. If you need a little extra staying power, use the hot glue gun with the staples; just be sure everything is done on the back of the cork board so the front stays nice and clean.
Once your finish stapling, gently turn the board over and add your embellishments.
With Christmas just over 5 weeks away, I am seriously starting to think of gift idea's for the many people in my life (you really wanted that reminder, didn't you?). Along with the gift-giving that comes along with Christmas, there is also the many dinners and parties you'll attend. In either case, wouldn't homemade vanilla extract be a wonderful gift idea for your family, friends and colleagues? Homemade gifts are really awesome and many people really love things that comes from the heart. It's within the meaning of Christmas after all.
Thanks to Bethany Actually (whom I found on Pinterest) and a couple of other online sources, I found out that making your own vanilla extract is actually super easy!
Here's what you'll need:
Vanilla Beans
Vodka, any brand and can be inexpensive. I used Absolut Vodka.
Glass bottles with lids
Measuring cup
Funnel
Knife
Cutting board
Paper Towels
Ribbon or twine (optional)
For the vanilla beans themselves, I bought mine through eBayfrom Vanilla Products USA and used Grade B Bourbon Planifolia Vanilla Beans grown in Madagascar. The service and delivery time were pretty good and I would purchase from them again. It costs about $24 (including shipping) for 30 beans.
For the glass bottles I used, I used 4 oz. Boston Round bottles purchased from Uline, which is located in Brampton, ON. You will need to purchase a case of 24 as a minimum. They were about $30 for the case.
First and foremost, be sure to wash your bottles and lids with hot soapy water and then let them air dry.
Using your sharp knife, cut your bean in half. Then, about a half inch down from the end slice the bean in half lengthwise.
Once you have all your beans cut and ready to go (I used all 30 of mine for 12 bottles), put 5 pieces (two and half full beans) of bean into your glass yours. If you have any extra pieces (I had one), just add it to a jar.
Once your jars are full of beans, you ready to pour the vodka. Add half cup of vodka to each bottle ensuring that the beans are fully covered.
Your funnel likely wont stay still on it's own so be sure to hold the funnel while your pouring in the vodka.
After adding the vodka, simply screw on the caps tightly and you're done! You can see the vodka starting to change colour almost instantly. Important care instructions: Be sure to store these in a cool dry place. From what I read online, the vanilla will be good to use in about two months time. Just be sure the give the bottles a gentle shake a few times a week. After the vanilla is ready you can remove the beans or leave them in, just note that the vodka will evaporate over a long period of time. In this case, simply top up the vodka to ensure the beans stay covered.
Since these are Christmas gifts, I went a step further and created these labels using MS Publisher. I followed the same label idea as Bethany Actually. Ingredients listed is love, vodka and vanilla beans. A sweet touch for your friends and family. In my case I only labelled 6 as I will likely keep a couple bottles for myself with all the baking I do, but also because I'll be including a bottle in my Secret Santa gift at work and will create a more generic label for that (will post about this gift idea sometime in November). Since the vanilla takes about two month's to be ready, you can also add a 'Best After Date' to your label or simply add that piece of info in your card (assuming you give them one).
I'm pretty happy with the way they turned out. The picture below shows how the colour changed in only a 24 hour period. They'll eventually be very deep amber in colour.
You can also dress up the bottles with ribbon or twine for a nice added touch.
I hope you enjoy making your vanilla as much as I did! Feel free to comment below with any questions, etc. Good Luck!