Showing posts with label Christmas. Show all posts

Tuesday, December 31, 2013

Chocolate Fudge Crackle Cookies


This Chocolate Fudge Crackle Cookie recipe is my all time favourite recipe to use during my Christmas baking. It's the cookie that gets even more raves than the Peanut Brittle Cookies! These are just so good! They are also good for freezing if you don't eat them right away (which is very hard to do, trust me).

This too, comes from 'The Love of Baking' recipe book from www.robinhood.ca. Lets get to it!

Prep Time: 15 mins + refrigeration I Bake Time: 13 mins per sheet I Makes: 48 crackles

¼         cup (50 mL) Crisco All-Vegetable Shortening
1          cup (250 mL) semi-sweet chocolate chips
¼         cup (50 mL) granulated sugar
2          eggs
2/3        cup (150 mL) Eagle Brand Regular or Low Fat Sweetened Condensed Milk
1          tsp (5 mL) vanilla extract
½      cups (375 mL) Robin Hood All-Purpose Flour
½         tsp (2 mL) baking powder
¼         tsp (1 mL) salt
1 ½      cups (375 mL) Chipits Milk Chocolate Chips
¾         cup (174 mL) icing sugar

Directions:

1. Preheat oven to 325oF (160 oC). Line two baking sheets with parchment paper.

2. In a glass bowl in microwave, melt shortening and semi-sweet chocolate chips on Medium (50%). Add in sugar and then eggs one at a time, stirring well after each addition. Let cool 5 minutes.

3. Mix in sweetened condensed milk and vanilla. Add next four ingredients; mix well to combine. Cover with plastic wrap and refrigerate for 1 ½ hours up to 8 hours.

4. Sift icing sugar in a shallow bowl. Between palms of hands, roll pieces of chilled dough to form 1 ¼" (3 cm) balls. Drop balls in icing sugar and toss lightly until well coated. Place on prepared baking sheets and flatten very slightly. Repeat with remaining dough and remaining icing sugar, spacing about 1 ½" (4 cm) apart.

5. Bake each sheet in preheated oven for 11 - 13 minutes or until just beginning to feel firm when pressed in centre. Let cool on baking sheet on wire rack for 5 minutes. Transfer crackles to wire racks to cool completely.


I really hope you enjoy these cookies as much as we do here. Let me know how you like them!

Enjoy!

Monday, December 30, 2013

Homemade Peanut Brittle Cookies


This is one of the recipes I used when I did my holiday baking and I have used this particular recipe since I started doing holiday baking with my sister years ago. It always gets rave reviews. The recipe itself comes from a small recipe book called 'The Love of Baking' from www.robinhood.ca. Actually, most of my holiday baking recipes come from this book. I can't recall exactly where I picked up the book from, but I'm sure you can find this recipe and more on their website. But let's get things started.

Prep Time: 10 mins I Bake Time: 12 minutes per sheet I Makes: 44 Cookies 

½       cup (125 mL) Crisco Golden All-Vegetable Shortening
½       cup (125 mL) light brown sugar, packed
¼       cup (50 mL) granulated suger
1        tbsp (15 mL) vanilla extract
1        egg
1 ¼    cup (300 mL) Robin Hood All Purpose Flour
½       tsp ( 2mL) each; baking soda and salt
1        pkg (300 g) Chipits REESE Peanut Butter Chips, divided
1        cup (125 mL) Chipits SKOR Toffee Bits
¾       cup (175 mL) unsalted peanuts

Directions:

1. Preheat oven to 350oF (180oC). Line baking sheets with parchment paper.

2. In a large bowl, beat shortening with sugars and vanilla until creamy. Beat in egg. Add flour, baking soda and salt, mixing until incorporated. Stir in 1 cup (250 mL) peanut butter chips, all toffee bits and all peanuts.

3. Drop mixture by rounded tablespoons (15 mL) onto prepared baking sheets, about 2" apart.

4. Bake each sheet in preheated oven 10 - 12 minutes or until deep golden brown and just set. Cool on sheet for 3 minutes. Remove to wire racks and cool completely. Melt remaining peanut butter chips in microwave on High for about 45 seconds. Drizzle over cooled cookies.

These really are delicious, however, I do not drizzle the remaining peanut butter chips on the cookies as I skip this step. I just don't think it's necessary because the cookies are already so good without it, not to mention that it was very messy the first time I did it.

These cookies also freeze really well so you can bake early and freeze until you really need them. Just remember to label that freezer bag.

Happy baking!

Sunday, December 29, 2013

Holiday Gift Idea's

This year I have two holiday gift idea's to share. The first one is a gift box that I put together for a lovely colleague of mine and the second one is related to all my holiday baking.

You may recall my gift idea from last year, so the first idea follows along the same lines.

My colleague is actually on the same training team I'm on and I consider us to be pretty good work friends. We laugh, we share, and our love for Starbucks seems to be growing together. We both have a thing for London Fogs (or Earl Grey Tea Latte's as Starbucks calls them), so I based her gift on that fact.

I bought a pretty pink gift box from Target for only $4.99 and then filled it with items she needs to make a London Fog at home. She is also new to baking so I included some home made cookies and her very first cookie scoop (she laughed at that one). Here's how it turned out.


The jingle bells on top of the gift is from Target.


The second gift idea was for Eric's daycare provider and included a lot of baking on mine and my sister's part. We typically have a baking day at my place every Christmas but unfortunately the year the weather spoiled our plans so we had to do our baking on our own. We made cookies, squares, chocolate bark, and shortbread. All delicious, since I tried at least of couple of everything :)

I then picked up a cute container from the dollar store, added some tissue paper and filled it with goodies. I also attached a really cute label I got from Sweet Metel Moments. Rehana (our day care provider), absolutely loved it and it was all home made so it's very touching for someone to receive gifts like this. I'll post some of the recipes we used soon!


The other good thing about these gifts is that they are great gifts for any time of the year and for any occasion.

Happy gift giving!

Holiday Home Tour 2013

Good morning, and welcome to our home!

I am pleased to give you a tour of how I decorated for Christmas this year. I didn't get to do as much as I had wanted to due to my husband travelling, but I am happy with what I did manage to get done. I hope you enjoy.

Front Entrance:
 

Our front entrance is all about simplicity. I do the garland and red bows on the railings every year and also add a wreath to our front door. This wreath is new this year since a leak in our garage ruined the other one we had. This one is from Target. I also added a nice potted plant in front, which is from Canadian Tire.

Our Living Room:


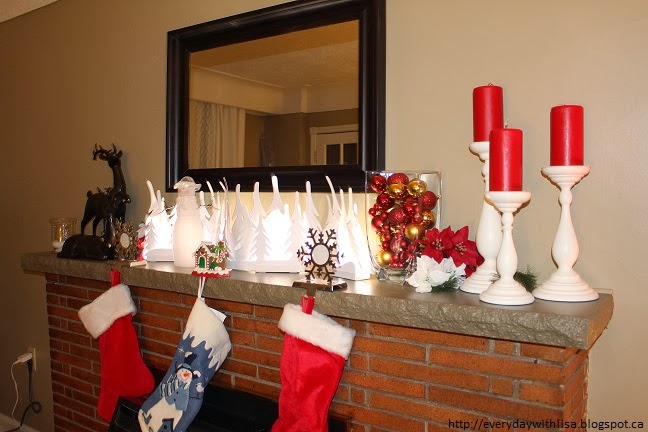
I decorate our mantel every year and try to do something different each time. This year I added these beautiful dear I picked up at Costco. My sister Shannon gave me this home made snow globe on Christmas day (she's very crafty) and it is a nice touch to the mantle.

Then there is our tree. We actually put it up by our patio door because it has the most space available. We then like to put all of the Christmas cards we receive on the bookshelf beside it.

I didn't get to do much else around the house this year, but I did manage to put a few small items in our basement. We have a big screen TV there so I just put a couple of items on either side of it on the TV stand. 
 

The first photo is a black decorative bowl with sparkly balls inside placed next to a picture of our nieces and a foam tree that Eric made last Christmas.

The second picture is a grey vase with sparkly floral pieces. I think placing photo's around it give it a really nice touch.

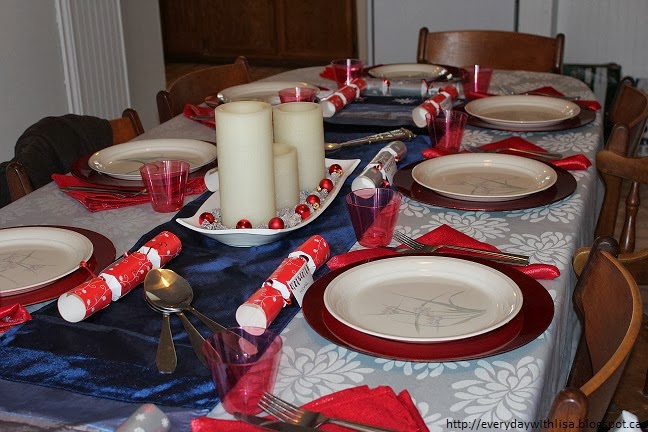
The last thing I'd like to share is our dining room set-up that I put together for Christmas dinner. It turned out beautifully. We had 10 adults and three kids over for Christmas dinner. It was lovely.


I hope you enjoyed this small home tour. I am already excited about going bigger and better for next year.

Happy New Year!

Wednesday, December 25, 2013

Merry Christmas!

From my family to yours, I wish you a very Merry Christmas and a wonderful New Year.

I hope yours wishes come true and that you are filled with happiness on this day and throughout the year.


Tuesday, November 19, 2013

Christmas is in the Air

Well, we're having our first light snow fall of the season - even if it's just a very light dusting. I'm not a big snow person in general to be honest, but I always appreciate the first snow fall. It's just so pretty. Snow on Christmas day is okay in my books too :)

This weather has been something else though. We hit 18 degrees Celsius on the weekend! It was the perfect weather for Doug to hang out Christmas lights and they look so nice. A simple classic line of white lights. Not the first Christmas decorations to go up though. In fact, I wanted to provide a sneak peek of my Holiday decorations.


All candles and the deer are from Costco.

Once I have the house fully decorated, within the next couple of weeks, I plan on giving a 'Holiday House Tour' on what I've done. 

Christmas is my absolute favourite time of year and I am so excited to share it with you!


Tuesday, November 12, 2013

Christmas Craft Day

I know what you're thinking; it's too early to think of Christmas. But to be honest, I start to think about it right after Halloween is done and over with. It's my absolute favourite time of the year; the music, lights, festivities and family events, I just can never get enough. And I've already started my Christmas shopping!

It is November 12th after all, and we're almost half way through the month. My sister Shannon and I decided it was the perfect time to do some Christmas crafts with the boys (my son Eric and my nephew Logan). Oh, we also baked some cookies too.

We did some painting, we made ornaments and reindeer and all around had a good half hour. Short and sweet I always say. Not to mention the boys' attention span was a little short that day. To be honest all they wanted to do was play with their toys, but at least we got some craft time in. I guess my post should be called Christmas Craft Half-Hour, but Christmas Craft Day just sounds so much better. 

Anyway, I wanted to share how are day went. 

This is only part of our supplies. Shannon brought over a bag full of things too.
We started with our popsicle stick Christmas tree's. Eric and Logan were very precise when colouring their popsicle sticks.

 
 Then we moved onto decorating felt Christmas tree ornaments. 
We also did some painting, made hand print reindeer and then made snowman ornaments from their thumb prints. These are Eric's finished crafts.
These are Logan's finished crafts.
 
After the crafts, we had the boys' layout cookie dough on the cookie sheet so we can bake some cookies. We just used the Pillsbury Reindeer Shaped cookies. 
 
After we had finished everything and as Logan was getting ready to go home, I think they were both ready for a nap. Just look at these cute, tired eyes. 

Needless to say, Eric slept for two hours that afternoon.

By the way, did I mention we also listened to Christmas music?

Sunday, October 20, 2013

Homemade Vanilla Extract

With Christmas just over 5 weeks away, I am seriously starting to think of gift idea's for the many people in my life (you really wanted that reminder, didn't you?). Along with the gift-giving that comes along with Christmas, there is also the many dinners and parties you'll attend. In either case, wouldn't homemade vanilla extract be a wonderful gift idea for your family, friends and colleagues? Homemade gifts are really awesome and many people really love things that comes from the heart. It's within the meaning of Christmas after all.

Thanks to Bethany Actually (whom I found on Pinterest) and a couple of other online sources, I found out that making your own vanilla extract is actually super easy! 

Here's what you'll need: 
  • Vanilla Beans
  • Vodka, any brand and can be inexpensive. I used Absolut Vodka.
  • Glass bottles with lids
  • Measuring cup
  • Funnel
  • Knife
  • Cutting board
  • Paper Towels
  • Ribbon or twine (optional)
For the vanilla beans themselves, I bought mine through eBay from Vanilla Products USA and used Grade B Bourbon Planifolia Vanilla Beans grown in Madagascar. The service and delivery time were pretty good and I would purchase from them again. It costs about $24 (including shipping) for 30 beans.

For the glass bottles I used, I used 4 oz. Boston Round bottles purchased from Uline, which is located in Brampton, ON. You will need to purchase a case of 24 as a minimum. They were about $30 for the case.
First and foremost, be sure to wash your bottles and lids with hot soapy water and then let them air dry.

Using your sharp knife, cut your bean in half. Then, about a half inch down from the end slice the bean in half lengthwise.

Once you have all your beans cut and ready to go (I used all 30 of mine for 12 bottles), put 5 pieces (two and half full beans) of bean into your glass yours. If you have any extra pieces (I had one), just add it to a jar.

Once your jars are full of beans, you ready to pour the vodka. Add half cup of vodka to each bottle ensuring that the beans are fully covered.
Your funnel likely wont stay still on it's own so be sure to hold the funnel while your pouring in the vodka.
After adding the vodka, simply screw on the caps tightly and you're done! You can see the vodka starting to change colour almost instantly.

Important care instructions: Be sure to store these in a cool dry place. From what I read online, the vanilla will be good to use in about two months time. Just be sure the give the bottles a gentle shake a few times a week.

After the vanilla is ready you can remove the beans or leave them in, just note that the vodka will evaporate over a long period of time. In this case, simply top up the vodka to ensure the beans stay covered.


Since these are Christmas gifts, I went a step further and created these labels using MS Publisher. I followed the same label idea as Bethany Actually. Ingredients listed is love, vodka and vanilla beans. A sweet touch for your friends and family.

In my case I only labelled 6 as I will likely keep a couple bottles for myself with all the baking I do, but also because I'll be including a bottle in my Secret Santa gift at work and will create a more generic label for that (will post about this gift idea sometime in November).

Since the vanilla takes about two month's to be ready, you can also add a 'Best After Date' to your label or simply add that piece of info in your card (assuming you give them one).


I'm pretty happy with the way they turned out. The picture below shows how the colour changed in only a 24 hour period. They'll eventually be very deep amber in colour.
You can also dress up the bottles with ribbon or twine for a nice added touch.
I hope you enjoy making your vanilla as much as I did! Feel free to comment below with any questions, etc.

Good Luck!